
Understanding how forex mechanics like leverage, position sizing, and trade execution work is essential for trading forex safely and effectively. These fundamentals determine how much risk you take, how much each trade is worth, and how your orders behave in real market conditions. This guide breaks down each concept with clear examples so you can trade with confidence.
What is Leverage in Forex Mechanics?
Leverage is one of the most powerful and risky tools in forex trading. It allows you to control a larger position than the cash you actually have in your account, amplifying both potential profits and potential losses.
Think of leverage like a magnifying glass: it makes small market moves look much bigger relative to your account size. That’s why understanding it is essential for trading safely.
How Leverage Works
Leverage is expressed as a ratio, such as 1:50, 1:100, or 1:500. A 1:50 leverage ratio means that for every $1 you have in your account, you can control $50 in the market.
Example:
You have $1,000 in your account and use 1:50 leverage. This means you can open a position worth $50,000.
Amplifying Gains and Losses
Because leverage magnifies everything, a small price movement can have a large impact on your account.
Example:
With a $1,000 account and 1:50 leverage, you can open a $50,000 position in EUR/USD. A 1% price move turns into $500 profit or $500 loss. That’s half your account!
Tip: Start with low leverage until you understand how it affects your account, because even small market moves can create significant gains or losses.
How Position Sizing Works
Position sizing determines how much of a currency pair you buy or sell per trade, based on your risk tolerance. It’s a key part of managing risk and protecting your account from large losses.
Step 1: Decide your risk per trade
Start by choosing how much of your account you’re willing to risk on a single trade. For example, if you have a $1,000 account and risk 1% per trade, that means you’re willing to risk $10.
Step 2: Calculate pip value
Next, determine how much each pip movement is worth for your trade. For EUR/USD:
- 1 micro lot (1,000 units) ≈ $0.10 per pip
- 1 mini lot (10,000 units) ≈ $1 per pip
- 1 standard lot (100,000 units) ≈ $10 per pip
Step 3: Determine your lot size
Divide your risk amount by your stop-loss in pips multiplied by the pip value. Using the previous example: a $10 risk with a 20-pip stop-loss and $0.10 per pip → $10 ÷ (20 × $0.10) = 5 micro lots.
Here’s a quick reference table:
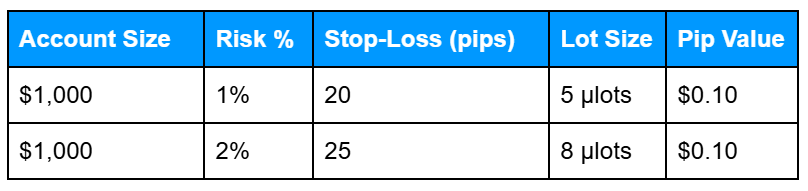
Tip: Consistent position sizing protects your account more than any strategy. By sticking to the same risk rules for each trade, you can weather losses and maximize gains over time.
How Forex Mechanics Execution Works
Execution determines how your orders are filled in the market. In forex, there are two main types of orders:
Market Orders
A market order executes immediately at the current price. For example, if EUR/USD is trading at 1.0850 and you place a market buy order, your trade will fill at that price (or very close to it). Market orders are simple and fast, making them ideal when you want to enter or exit a trade immediately.
Pending Orders
Pending orders allow you to specify a price at which you want to buy or sell. For instance, you might set a buy limit on EUR/USD at 1.0800, meaning your trade will only execute if the market reaches that level. Pending orders are useful for planning entries or exits without watching the charts constantly.
Factors That Affect Execution
How smoothly your order is filled depends on several factors:
- Spreads: This is the difference between the buy (ask) and sell (bid) prices. Wider spreads increase trading costs, especially for low-liquidity pairs or during volatile times.
- Slippage: Slippage occurs when your trade executes at a different price than requested. This often happens during sudden news events or rapid price movements. For example, you may place a buy at 1.0850, but it fills at 1.0852, slightly reducing your expected profit.
- Liquidity: Highly liquid pairs like EUR/USD tend to fill quickly and near your requested price. Less liquid pairs, like USD/TRY, may experience delays or larger slippage.
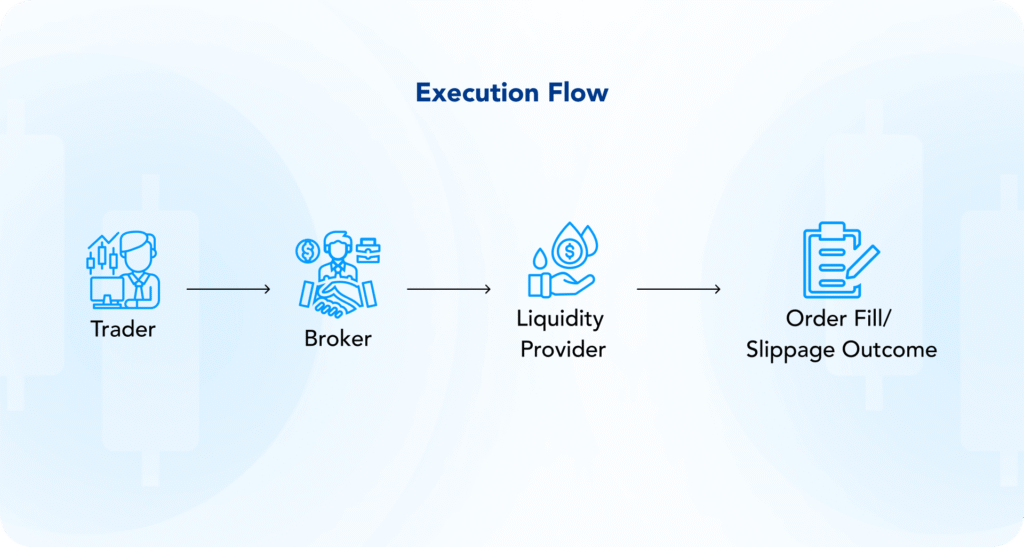
This flow shows how your order moves from your trading platform to the market.
Understanding it helps explain why prices can differ slightly from what you expect, especially in fast-moving markets.
Tips:
- Trade during high-liquidity sessions (like London/New York overlap) to get tighter spreads and more reliable fills.
- Avoid placing trades during major news events as price spikes can lead to unexpected slippage.
- Start with smaller trade sizes while learning how execution works to see how spreads and slippage affect your results.
Practical Examples & Calculations
Understanding position sizing and leverage is easiest with real examples. Let’s compare two trades using a $1,000 account:
Example 1: Correct Position
You decide to risk 1% of your account ($10) on a trade. You set a stop-loss of 20 pips and calculate your lot size as 5 micro lots.
- Pip value: $0.10
- Potential loss if the trade hits stop-loss: 20 pips × $0.10 = $2
This is well within your $10 risk limit. Even if the trade goes against you, your account remains mostly intact, letting you trade another day and learn from the outcome.
Example 2: Over-Leveraged Position
Now imagine risking $500, half your account, on a 1 standard lot trade.
- Pip value: $10
- 20-pip adverse move → 20 × $10 = $200 loss (20% of your account)
A single unfavorable move can wipe out a significant portion of your account, making it harder to recover. Emotional pressure increases, and it’s easy to make mistakes.
Tip: Small, calculated positions let you survive losing streaks, trade consistently, and protect your capital. By sticking to sensible risk limits, you turn trading into a sustainable activity rather than gambling.
Common Mistakes with Leverage and Sizing in Forex Mechanics
Even experienced traders make mistakes when it comes to leverage and position sizing. Understanding these common pitfalls can help you avoid costly errors.
Trading too large too soon
Jumping in with a large position before you’ve practiced can quickly drain your account. Beginners should start with micro-lots until they consistently execute trades and understand how leverage affects gains and losses.
Ignoring spreads or swap fees
Every trade has hidden costs: the spread (difference between buy and sell prices) and swap fees for overnight positions. Failing to account for these can turn a small winning trade into a small loss. Always check these costs before entering a trade.
Over-leveraging
Leverage magnifies both profits and losses. Opening positions that are too large relative to your account size can wipe out a significant portion of your capital in a single move. Start low and increase gradually as your experience grows.
Emotional scaling after losses
It’s tempting to chase losses by increasing position sizes, hoping to recover quickly. This usually backfires and compounds losses. Stick to your pre-defined risk per trade and maintain discipline, even during losing streaks.
Tip: Protect your account by defining your risk before entering any trade. Trading consistently with small, calculated positions is the fastest way to learn and grow your account safely.
Step-by-Step Guidance for Safer Trade Setup
Setting up trades correctly from the start helps protect your account and build good habits. Follow these steps:
- Decide your risk per trade – e.g., 1% of your account balance.
- Set stop-loss and take-profit levels – define how much you’re willing to lose or aim to gain before entering the trade.
- Calculate your lot size – use your risk and pip value to determine the correct position size.
- Choose your order type – market orders execute immediately; pending orders execute at your specified price.
- Check liquidity and spreads – ensure the pair you’re trading has enough volume and tight spreads for smoother execution.
- Demo trade first – practice the setup on a demo account to see how the trade would perform without risking real money.
Tip: Using a demo account repeatedly helps you understand risk management, platform tools, and position sizing so you can trade confidently when going live.
By understanding the core mechanics of forex, you’ll be able to manage risk effectively, set trades with confidence, and build a strong foundation for more advanced trading strategies.
Frequently Asked Questions About Forex Trading
Q: What is leverage in forex?
A: Leverage lets you control a larger position with a smaller deposit. It magnifies both profits and losses.
Q: How do I calculate position size?
A: Divide the amount you’re willing to risk by the product of stop-loss pips × pip value.
Q: What is slippage?
A: Slippage occurs when your order executes at a different price than expected, often in volatile markets.
Q: Should beginners use high leverage?
A: No. High leverage can lead to large losses quickly. Start with low leverage and small positions.
Related Articles and Further Reading
- Forex Trading Basics: How It Works & Key Concepts
- Forex Trading Costs: Swaps, Overnight Fees & Slippage Explained
- Forex Risk & Profitability: Factors Affecting Prices, Trading Risks & Safe Strategies
Next Steps
Want to learn more?
Find out how the main trading costs in forex work in our article on swaps, overnight fees, and slippage.